Advanced Installing
OS Support
- Red Hat Linux family:
- Red Hat Enterprise Linux 7+
- Cent OS 7+
- Scientific Linux 7+
- Debian Linux family:
- Ubuntu Linux 14.04 LTS
- Debian Linux 8+
Prerequisites
For Red Hat based OS
Install EPEL repository and an extra package for node.js:
sudo rpm -ivh https://dl.fedoraproject.org/pub/epel/epel-release-latest-7.noarch.rpm
Upgrade and reboot system:
sudo yum update -y
sudo reboot
Install some important packages before proceeding:
sudo yum install -y python2-pip gcc nano git
For Debian based OS
Install some important packages before proceeding:
sudo apt-get update && sudo apt-get install -y python-pip git
Install Salt
sudo pip install salt==2014.7.1
Install CIRCLE
Get the installer
Clone CIRCLE installer GIT repository:
git clone https://git.ik.bme.hu/circle/salt.git
Change configuration variables
Modify installer.sls file. In the example below we use nano, but you could use any other text editor as well.
nano salt/pillar/installer.sls
Most used variables
- proxy_secret: This is used to provide cryptographic signing, and should be set to a unique, unpredictable value.
- secret_key: This is used to provide cryptographic signing, and should be set to a unique, unpredictable value.
- deployment_type: production or local (for development)
- admin_user: user name to log in as admin on the site
- admin_pass: password to log in as admin on the site
- database:
- password: database user’s password
- amqp:
- password: amqp user’s password
- host: amqp server IP - usually runs at localhost
- graphite:
- password: graphite user’s password
- host: graphite server IP - usually runs at localhost
- nfs:
- enabled: to enable nfs, set to
true - server: nfs server’s hostname
- network: nfs server’s network to access files
- directory: this directory will be shared
- enabled: to enable nfs, set to
- storagedriver:
- queue_name: the server’s hostname Attention: it has to be set properly, or else storagedriver won’t be accessible.
- fwdriver:
- queue_name: the server’s hostname Attention: it has to be set properly, or else firewall won’t be accessible, and some network functions won’t work.
- gateway: the server’s gateway
- external_net: the server’s network
- external_if: the server’s network interface
Other variables
- user: user who will install the software
- timezone: the server’s time zone, format is region/city
- amqp:
- user: amqp user
- port: amqp server’s port
- vhost: virtual host - specifies the namespace for entities (exchanges and queues) referred to by the protocol
- agent:
- repo_revision: revision
- agentdriver:
- repo_revision: revision
- cache: cache url - usually pylibmc://127.0.0.1:11211/
- database:
- name: django database’s name
- user: database user
- fwdriver:
- repo_revision: revision
- user: fwdriver user name
- vm_if: vm interface
- vm_et: vm network
- management_if: management interface
- graphite:
- user: graphite user
- port: graphite server’s port
- secret_key: graphite’s secret key
- manager:
- repo_revision: revision
- monitor-client:
- repo_revision: revision
- storagedriver:
- repo_revision: revision
- vmdriver:
- repo_revision: revision
- vncproxy:
- repo_revision: revision
Install CIRCLE with Salt
Run the installation command below. Note: This might take a while.
sudo salt-call state.sls allinone --local --file-root=$HOME/salt/salt --pillar-root=$HOME/salt/pillar
After installation is successfully finished, you should get a
Failed: 0 message. If you got something else, please check the
Troubleshooting topic.
Quickstart - Standalone Node
Login
Log in to the CIRCLE admin website (the site is accessible on port 443).
Name and password is in salt/pillar/installer.sls. After logging in
the dashboard welcomes you. Now you can manage the whole CIRCLE.
Create Node
Virtual machines run on Nodes. We need to create at least one Node and add it to the system. To do so click on the “new” button on the Nodes dashboard menu.
Configure Node
To create a simple standalone configuration, type the current machine’s
hostname, MAC and IP address to Host/Name, Host/MAC, HOST/IP field,
respectively. Then choose managed-vm as VLAN. See an example below:
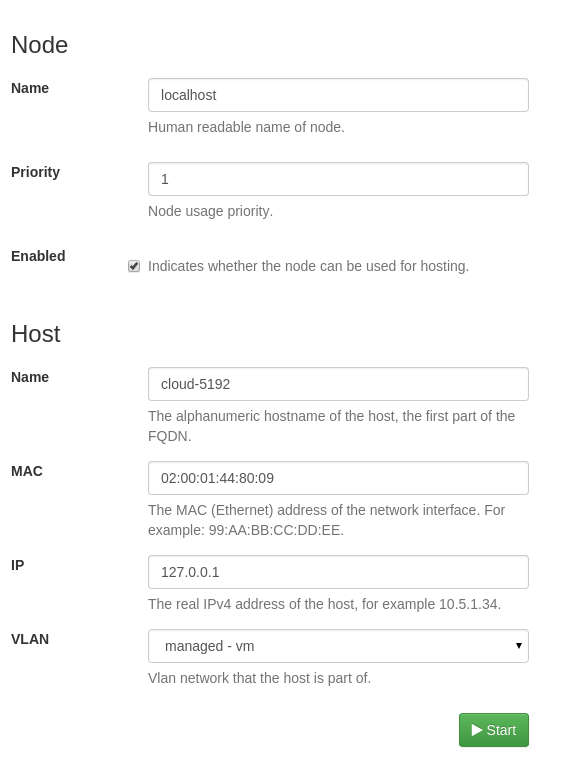
Standalone node configuration
Activate Node
Open the detail page for the created Node by selecting it on the Nodes list on the dashboard. Activate the selected Node by clicking on the “Activate” button. See below:

Activating Node