CIRCLE Project Salt Installer
OS Support
- Red Hat Linux family:
- Red Hat Enterprise Linux 7+
- Cent OS 7+
- Scientific Linux 7+
- Debian Linux family:
- Ubuntu Linux 14.04 LTS
- Debian Linux 8+
Prerequisites
For Red Hat based OS
Install EPEL repository and an extra package for node.js:
sudo rpm -ivh https://dl.fedoraproject.org/pub/epel/epel-release-latest-7.noarch.rpm
Upgrade and reboot system:
sudo yum update -y
sudo reboot
Install some important packages before proceeding:
sudo yum install -y python2-pip gcc nano git
For Debian based OS
Install some important packages before proceeding:
sudo apt-get update && sudo apt-get install -y python-pip git
Install Salt
sudo pip install salt==2014.7.1
Install CIRCLE
Get the installer
Clone CIRCLE installer GIT repository:
git clone https://git.ik.bme.hu/circle/salt.git
Change configuration variables
Modify installer.sls file. In the example below we use nano, but you could use any other text editor as well.
nano salt/pillar/installer.sls
Most used variables
- proxy_secret: This is used to provide cryptographic signing, and should be set to a unique, unpredictable value.
- secret_key: This is used to provide cryptographic signing, and should be set to a unique, unpredictable value.
- deployment_type: production or local (for development)
- admin_user: user name to log in as admin on the site
- admin_pass: password to log in as admin on the site
- database:
- password: database user’s password
- amqp:
- password: amqp user’s password
- host: amqp server IP - usually runs at localhost
- graphite:
- password: graphite user’s password
- host: graphite server IP - usually runs at localhost
- nfs:
- enabled: to enable nfs, set to
true - server: nfs server’s hostname
- network: nfs server’s network to access files
- directory: this directory will be shared
- enabled: to enable nfs, set to
- storagedriver:
- queue_name: the server’s hostname Attention: it has to be set properly, or else storagedriver won’t be accessible.
- fwdriver:
- queue_name: the server’s hostname Attention: it has to be set properly, or else firewall won’t be accessible, and some network functions won’t work.
- gateway: the server’s gateway
- external_net: the server’s network
- external_if: the server’s network interface
Other variables
- user: user who will install the software
- timezone: the server’s time zone, format is region/city
- amqp:
- user: amqp user
- port: amqp server’s port
- vhost: virtual host - specifies the namespace for entities (exchanges and queues) referred to by the protocol
- agent:
- repo_revision: revision
- agentdriver:
- repo_revision: revision
- cache: cache url - usually pylibmc://127.0.0.1:11211/
- database:
- name: django database’s name
- user: database user
- fwdriver:
- repo_revision: revision
- user: fwdriver user name
- vm_if: vm interface
- vm_et: vm network
- management_if: management interface
- graphite:
- user: graphite user
- port: graphite server’s port
- secret_key: graphite’s secret key
- manager:
- repo_revision: revision
- monitor-client:
- repo_revision: revision
- storagedriver:
- repo_revision: revision
- vmdriver:
- repo_revision: revision
- vncproxy:
- repo_revision: revision
Install CIRCLE with Salt
Run the installation command below. Note: This might take a while.
sudo salt-call state.sls allinone --local --file-root=$HOME/salt/salt --pillar-root=$HOME/salt/pillar
After installation is successfully finished, you should get a
Failed: 0 message. If you got something else, please check the
Troubleshooting paragraph.
Quickstart - Standalone Node
Login
Log in to the CIRCLE admin website (the site is accessible on port 443).
Name and password is in salt/pillar/installer.sls. After logging in
the dashboard welcomes you. Now you can manage the whole CIRCLE.
Create Node
Virtual machines run on Nodes. We need to create at least one Node and add it to the system. To do so click on the “new” button on the Nodes dashboard menu.
Configure Node
To create a simple standalone configuration, type the current machine’s
hostname, MAC and IP address to Host/Name, Host/MAC, HOST/IP field,
respectively. Then choose managed-vm as VLAN. See an example below:
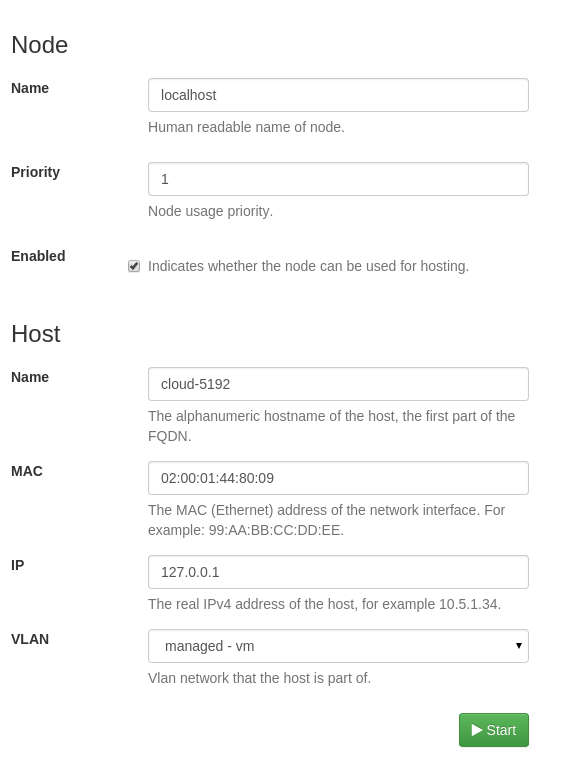
Standalone node configuration
Activate Node
Open the detail page for the created Node by selecting it on the Nodes list on the dashboard. Activate the selected Node by clicking on the “Activate” button. See below:

Activating Node
Start virtual machine
For creating Virtual Machines (VMs), we use “templates”. Templates are images based on previously saved VMs. After a fresh install there aren’t any templates. To create a new one click on the “new” button on the Templates dashboard menu and choose “Create a new base VM without disk”. To proceed click “Next”. Following the above steps, you will be taken to the template’s configuration page.
Configure Template
To properly configure the template, you must check the “boot menu” checkbox. Also note that fields marked with an asterisk(*) must be filled. That means you have to fill out the “Name” and “Operating system” fields, according to the operating system you are installing. Please choose the appropriate option from the “Networks” and “Lease” settings.
To enable the VM to have internet access, you should choosemanaged-vmfrom the “Networks” list.Recomended network setting
Finally, you are ready to create the template by clicking “Create new template” at the bottom of this configuration page.
Add disk
Currently we don’t have any disks attached to our VM. To add one, choose the “Resources” tab. Click on the “create disk” button and set the name and size. See an example below:
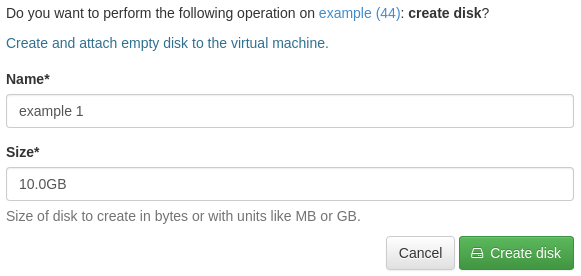
Disk setup
Attach ISO
To install an OS, we use installation ISO images. In order to allocate one ISO image, click on the “download disk” and type the ISO’s URL. See an example below:
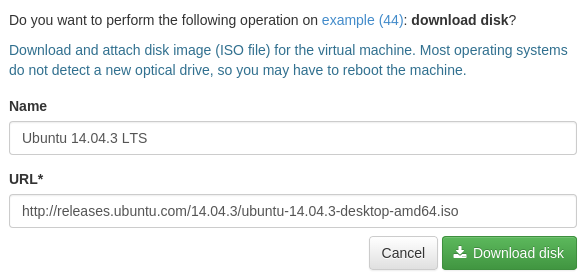
Allocating and downloading an ISO
Template creation tutorial
For the next steps, you can follow the tutorial on the template creation page or continue with the following steps. The tutorial looks like the image below:
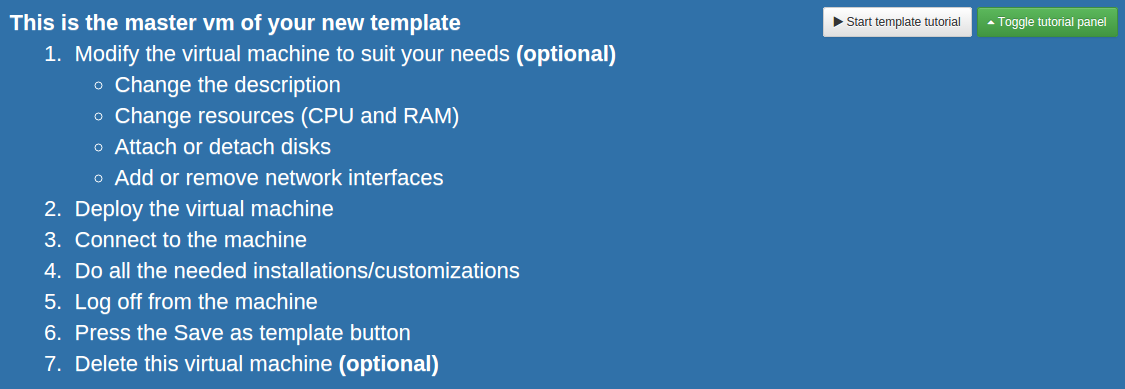
Template tutorial
Deploy master VM
It’s time to start your master virtual machine of your new template by choosing the “deploy” button. As a last step, you may have to select a Node for your VM. If you do not change the default selection, the system will choose the best fitting one for you. See an example below:
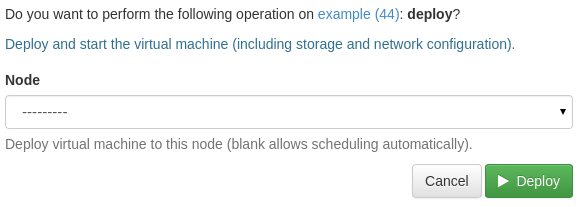
Node selection example
Install OS
Now you are ready to connect to the master virtual machine and make the necessary configurations and installations. Do not use any personal information in this step!
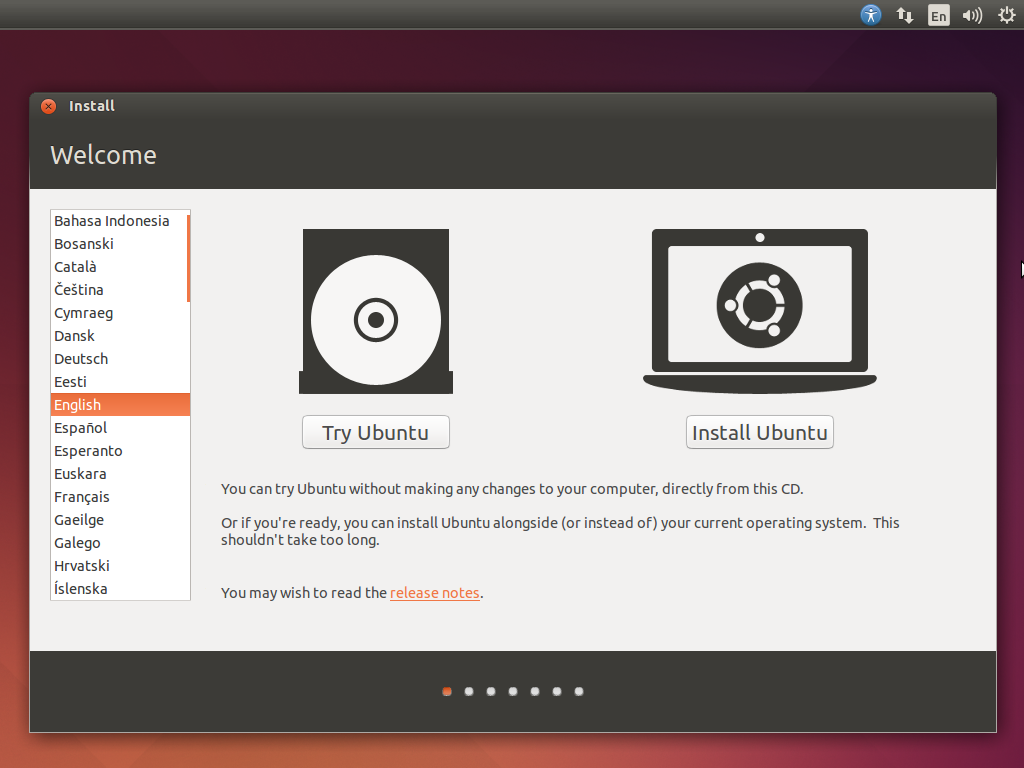
Installation example with Ubuntu 14.04
Delete ISO
After setting the master virtual machine up for further replication, it’s highly recommended to delete the downloaded ISO by clicking on the “Remove” button on the “Resources” tab.
See below:
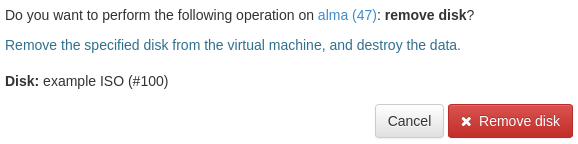
Removing ISO
Save Template
Now everything is ready to save the template. Click on the “save as template” button (see an example below). Fill in the name field with a name that represents what this template is about. This will save all the modifications you have done so far. Users who get permission to use this template are able to create their virtual machines with your saved settings.
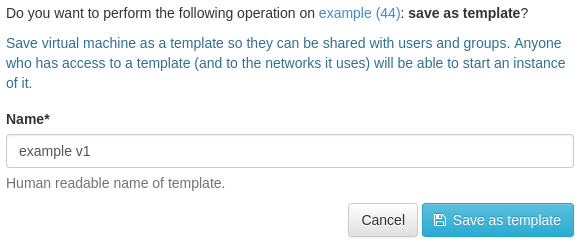
Saving and creating a named template
Installed user guide
All CIRCLE installation contains a user guide that everyone can access from the bottom of the dashboard by clicking on the “Help” link. (Or check out ours)
Troubleshooting
CIRCLE admin page won’t load
Maybe port 443 is closed. Check it and if it’s closed, open it.
Some services aren’t functioning while running a second CIRCLE in a CIRCLE VM
In this case the CIRCLE service agent could interfere with the RabbitMQ service. CIRCLE agent is not required for the newly installed CIRCLE. You should remove it with one of the following commads:
If you have upstart:
sudo rm -f /etc/init/agent.conf
Or if you have systemd:
sudo rm -f /etc/systemd/system/agent.service
Home page of a node or a VM shows “No Data” instead of graphs
Check if your hostname file contains fully qualified domain name instead of short host name:
sudo nano /etc/hostname
If you see something similar to cloud.example.com, edit it so that
only the part before the first period remains (e.g. cloud). Then set
the host name accordingly:
sudo hostname -F /etc/hostname
Then restart the monitor-client service. On Red Hat or Debian:
sudo systemctl restart monitor-client.service
On Ubuntu 14.04:
sudo service monitor-client restart